Local Records :: Conservation Services :: Conservation Services Humidification
HUMIDIFICATION AND FLATTENING OF DOCUMENTS
Paper documents that have been folded or rolled for many years have a tendency to resist opening. Sometimes a document may even be so stiff and brittle that it will crack or break when opened. In this case, it may be necessary to humidify the document in order to unfold or unroll it safely.
For our purposes, humidification is the process of introducing moisture into paper by placing the document inside an enclosed area with a water source. Water vapor enters the fibers of the document, allowing them to relax. Often the document may then be opened safely, after which it can be pressed and dried to keep it flat.
Some reasons to humidify
- If a document is too brittle or inflexible to unfold or unroll it without damage.
- If a document can be unfolded, but is still so distorted after unfolding that it will deform the documents stored with it.
- If a document needs to be flat for framing or exhibition.
Some reasons not to humidify
- Though humidification is a relatively safe procedure, there is always some risk when documents are exposed to water.
- Some items that should only be treated by professional conservators are:
- documents of exceptional importance or value.
- non-paper documents such as parchment and vellum.
- photographs.
- documents with delicate or friable media, such as gouache, pastel or charcoal.
- coated or varnished papers – these papers may appear slick or shiny, and this coating can become sticky or cloudy
when exposed to moisture.
- documents that are heavily soiled.
- documents that show evidence of previous mold growth.
- For help finding and selecting a conservator, contact the American Institute for Conservation at (202) 452-9545 or visit their website at https://www.culturalheritage.org/. More information on selecting a conservator can be found in Jan Paris’ Choosing and Working With a Conservator.
Preliminary steps
- Clean the document as much as possible before humidifying. The introduction of moisture can cause dirt to sink into paper fibers, making it difficult or impossible to remove afterwards. Overall cleaning may not be an option if the document is too stiff to open without risking damage; if so, just clean the outer areas. See our Conservation Note on Surface-Cleaning of Paper for more information.
- Unfold or unroll the document before humidifying, if that can be done without damaging it.
- Remove fasteners such as staples and paper clips prior to humidification, if doing so will not damage the paper. Metal fasteners can rust in humid conditions.
- Whenever possible, separate bundles of documents into single sheets. This will allow the paper to humidify more quickly and efficiently. If the documents are too stiff or brittle to separate without damage, humidify the entire bundle and separate the pages as they relax.
- Try to start early in the day. This process may take several hours, and documents should never be humidified overnight.
- Read the “Cautions” section below.
There are several methods of humidifying documents. This Note explains how to use two of the safest and most practical methods: a humidification chamber and a Gore-Tex Laminate stack.
HUMIDIFYING WITH GORE-TEX LAMINATE
Gore-Tex Laminate consists of a layer of Gore-Tex membrane fused to a layer of spunbonded polyester. Gore-Tex is a very dense material that will only let water pass through it as a vapor, providing gentle and safe humidification of paper documents. Although the initial cost of purchasing a piece of Gore-Tex Laminate is higher than the chamber described below, with proper care a piece of Gore-Tex can last a very long time. This method is also much faster than using a chamber.
Supplies needed
- Gore-Tex Laminate, one sheet, cut larger than the largest document to humidify. An even larger sheet can be used to humidify several smaller documents side by side at once. Gore-Tex Laminate has a rough side and a smooth side. Always place the documents against the smooth side. Gore-Tex Laminate can be obtained from Talas.
- Polyester film, two pieces, each cut approximately 1” larger in both dimensions than the Gore-Tex. Suitable polyester film (sometimes sold as Mylar or Melinex) can be obtained from several archival supply companies.
- Blotting paper (blotters) , one sheet, cut slightly smaller than the Gore-Tex. It is available from archival supply companies. It is a thick, usually 100% cotton sheet that is soft, porous, and very absorbent. Blotters are sometimes available in different thicknesses; if so, the medium weight is the most useful.
- Water. The amount needed will depend on the size of the blotter: for example, a 20” x 30” blotter will need approximately 5 oz. of water to wet it thoroughly. The water should be room temperature or cooler, to reduce condensation under the polyester film.
- Weights. These are used to help hold the polyester film cover flat at the edges. Undulations in the cover can allow moisture to escape. Strips of Plexiglas, approximately 3” wide x ¼” – ½” thick, work very well. Weights are placed on top of the polyester film cover, to the sides of the documents below. Weights should not be placed on top of documents.
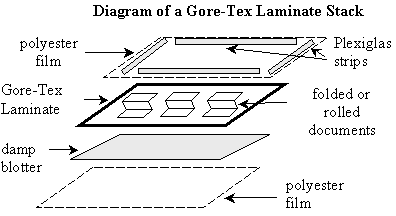
The procedure (see diagram above)
- Choose a work surface that is clean and flat. Place one piece of the polyester film on the work surface. This will protect the work surface from moisture.
- Place the piece of blotter on the polyester film.
- Wet the blotter as evenly as possible with water. A spray bottle will wet evenly, but will take a long time. A watering can or a jar with holes punched in the lid may be quicker. The blotter should be very damp, but not dripping. It should be at the point where it is well saturated with water, but no pools of unabsorbed water are showing. If the blotter is unevenly wet, wait several minutes to give the water a chance to spread to the dryer areas of the blotter. Use the blotter or a towel to wipe up any droplets of water around the blotter.
- Place the piece of Gore-Tex Laminate on top of the blotter, rough side down.
- Place the document(s) on top of the Gore-Tex.
- Cover the stack with the other piece of polyester film.
- Weight the edges of the polyester film, if necessary, to prevent the moisture from escaping.
- Check the progress of the document(s) every 5-10 minutes or so. Do not leave the top piece of polyester film off the Gore-Tex stack for too long, or the humid air will escape.
- The humidifying time will vary. When a document is ready to be removed, it will stay unfolded or unrolled on its own, and it may feel cool and slightly damp. It will take longer for a folded or rolled document to relax, as there is less document surface exposed to the humid air. Unroll or unfold the document bit by bit as it relaxes, to speed up the process.
- Once the documents have relaxed, dry them in a blotter stack to keep them flat. Please see the section on “Drying and Flattening” below.
HUMIDIFYING WITH A CHAMBER
The humidification chamber described below is an effective and economical way to humidify documents, and can be constructed from materials found around the house or at the local hardware store.
Supplies needed
- Plastic container with a tight-fitting lid. Select one made of solid plastic with no ventilation holes. Choose clear plastic, if possible, to allow you to more easily monitor the progress of the documents inside. Rubbermaid, Sterilite and several other companies make suitable storage containers in various sizes and shapes. The size of the container will depend on what type of documents will be humidified and how many will be done at once. For a few small documents, a shallow, under-the-bed storage box works nicely. For larger items or multiple items, a large plastic storage tub may be more useful. Just keep in mind that the deeper the container, the longer it will take for the air inside to become saturated with the water vapor, and the longer it will take to humidify the documents.
- Towel. Cut the towel to a size slightly smaller than the bottom of the plastic container.
- Water. Use water that is room temperature or cooler, to reduce condensation inside the chamber.
- Light diffuser panel. These are the plastic grids made to cover fluorescent lights in drop-ceilings. They can be obtained from building supply stores. The document will rest on this panel, so it should have a small grid, approximately 1/2”, to give solid, even support. The panel should also be at least 3/8” thick, to prevent the document from touching the wet towel below. Cut the panel to fit flat in the bottom of the container. Wire snips work well, but use caution when cutting - the plastic is quite brittle, and bits may fly about as it is cut. Wear protective eye gear when cutting the panel.
- Weights . These are used to help hold the document open as it relaxes. Choose smooth, light weights without colors that could transfer to the document in moist conditions. 2” x 2” pieces of glass or Plexiglas with smoothed edges and corners work very well.
The procedure
- Soak the towel with water and lightly wring it out.
- Place the towel flat in the bottom of the container. This is the moisture source.
- Place the piece of diffuser panel on top of the towel.
- Place the document(s) on top of the diffuser panel. If a document is folded or rolled, leave room for it to relax and open without touching the sides of the chamber or the document next to it.
- If there are several documents to humidify, diffuser panels may be stacked to humidify more than one layer at a time. Place something between the panels at the corners to raise them at least 3” apart to allow good circulation of the damp air between the layers. Make sure that whatever you use to elevate the panels is sturdy and of a non-rusting material. Small, clean plastic butter tubs work well.
- Cover the container and wait. Check the progress of the document every 15 minutes or so. If you must open the container, do not leave the lid off for long, or the humid air will escape, and this will prolong the humidification process.
- The humidifying time will vary. When a document is ready to remove, it will stay unfolded or unrolled on its own, and it may feel cool and slightly damp. Also, it will take longer for a folded or rolled document to relax, as there is less document surface exposed to the humid air. You can speed up the process somewhat by unrolling or unfolding the document bit by bit as it relaxes. Use the weights to help hold the document open. Avoid placing the weights on top of ink or other media, and remove them as soon as the document will stay open on its own.
- Once the documents have relaxed, dry them in a blotter stack to keep them flat. Please see the section on “Drying and Flattening” below.
Cautions about Humidification
- Make sure that the documents do not touch the moisture source. Serious and permanent damage, such as water spots and running inks, can result from allowing the document to touch the wet towel or the damp blotter.
- When humidifying a rolled document in the chamber, make sure that it cannot roll off the diffuser panel and touch the damp towel at the sides.
- When using the chamber, do not allow the documents to come into contact with the walls or the lid. If condensation develops, the document can pick up water drops from these areas.
- Remember that the document will be even more fragile when damp, so handle it as carefully as possible, especially if the document is torn.
- To avoid smudges, try not to touch areas of the document that have ink or other media on them while it is damp.
- It is not necessary or advisable to allow a document to get really damp before you remove it from the chamber.
- Keep in mind that mold can grow in damp conditions, so never humidify a document for more than 8 hours. Normally, it should take considerably less time for a document to relax sufficiently to flatten it.
- Between uses, allow the humidification supplies to dry completely before storing. This will help prevent mold growth.
- After it is dry, the Gore-Tex Laminate should be stored flat or rolled. Never fold or crease the Gore-Tex, as this is likely to break the membrane and allow water droplets through in that area.
DRYING AND FLATTENING
After the document has relaxed, remove it from the chamber or Gore-Tex Laminate and press in a “blotter stack” to keep it flat while it dries.
Supplies needed
- Blotting paper (blotters). See specifications above, under “Humidifying with Gore-Tex Laminate.” When used correctly, blotters can be dried and re-used many times for flattening. Cut the blotters to a uniform size, at least 1” bigger than the largest document to be flattened.
- Plexiglas , at least 3/16” thick, with the edges smoothed for safety. Plexiglas can be ordered from glass supply stores. It should be the same size or slightly larger than the blotters.
- Weights. Use anything that will provide moderate, even pressure across the Plexiglas while the documents are drying. Heavy books such as dictionaries and encyclopedias work very well.
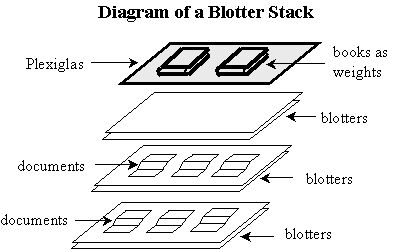
The procedure (see diagram above)
- Place two blotters, larger than the documents, on a clean level surface.
- Lay the documents flat on the blotting paper and gently straighten turned-over corners and creases.
- Place two more blotters on top of the documents.
- Cover with the piece of Plexiglas.
- Distribute weights evenly across the surface of the Plexiglas.
- Leave the documents in the blotter stack a minimum of 12 hours. The entire process may then be repeated if the desired flatness is not achieved. Keep in mind, however, that it is not usually necessary for a document to be completely flat – just flat enough that it can be used and stored without danger of further damage.
- Several layers of blotters and documents can be stacked together in the same blotter stack. Make sure that there are at least two blotters between each document.
- It is best to place only documents of approximately the same size in the same blotter stack so as to maintain even pressure across the entire face of the documents. Also try to place the documents in approximately the same location on the blotters.
Cautions
- Sometimes spots of adhesive on a document can soften when humidified and become sticky. These can then adhere the document to the blotters as it dries. If you suspect that there is any adhesive on the document, insert sheets of spunbonded polyester (sometimes marketed as Reemay and Hollytex) between the document and the blotters to prevent sticking. Reemay and Hollytex may be found in the archival supply catalogs, or in the “interfacing section” of a local fabric store.
- Do not use too many weights on the blotter stack. Just use enough to put firm, even pressure across the piece of Plexiglas.
- Blotters can be used many times, as long as they stay clean and flat. After the documents are removed from the blotter stack, leave the used blotters in the stack with the weights on top to prevent warping of the blotters as they dry.
Sources
- Glaser, Mary Todd. “Relaxing and Flattening Paper by Humidification.” In Preservation of Library and Archival Materials: A Manual. Andover: Northeast Document Conservation Center, 1999.
For further information
The conservation staff of the Local Records Preservation Program is available to provide additional guidance and support. Contact them at: P.O. Box 1747, Jefferson City, MO 65102, (573) 751-9047, or [email protected].
The Local Records staff has compiled a list of preservation-related vendors, particularly those that provide supplies and services to Missouri citizens and government officials. It is available from the Local Records office or at http://www.sos.mo.gov/CMSImages/LocalRecords/Vendors_Information.pdf
Published by the Local Records Preservation Program, Missouri State Archives, Office of the Secretary of State. The full set of Conservation Notes on this and other topics is available at http://www.sos.mo.gov/archives/pubs
Revised July 2003
The Missouri Secretary of State and employees of that office cannot be held responsible for interpretation or negligence concerning information presented in this handout that ultimately results in damage to cultural property or presents a health risk.